Thursday, June 23, 2011

Home made edible arrangements

These are so fun, easy and cheap to make. I have made 3 so far and everyone just loved them and the fact that I took the time to make it myself. Home made gifts are always fun!


What you need
*Vase or container of some sort
*iceberg lettuce or cabbage
*kale
*wooden skewers
*gum drops or dots (keeps fruit from sliding down the skewers)
*cookie cutter/s (optional)
*fruit/s of your choice, depending on how you want your arrangement to look.
  I personally think that strawberries, pineapple and grapes work the best but you can also use orange slices, kiwi slices, watermelon slices, marshmellows or anything else you think would look and taste good. This is where you get to have fun and most importantly... be creative! : )

Directions:
*If you are using a clear/see through vase you can fill the bottom part with whatever you please(I used grapes) just make sure you fill the top with lettuce or cabbage. If it's not clear/see through just go ahead and stuff your container with the lettuce or cabbage(this is so the skewers stay in place).
*put a little kale on the very top. This gives that pretty green leafy look.
*place a gumdrop/dot on the skewer and then place your fruit on top.
*Now for the fun part!Stick the skewers (with fruit) in to create your arrangement adding kale as you go along to hide the  wooden skewers.
*Don't worry if you see a wooden skewer showing just stick some kale in there to cover it up : )

***Remember the options are endless. You can cover your fruit with chocolate, sprinkles, cut different shapes with cookie cutters, or add other edible sweets/candies etc. Have fun and get creative!!!

Tuesday, May 10, 2011

Easy and creative dessert for summer

This Sand pale dessert is fun,easy, creative, & different. Everyone will love it.
Obviously, you will need a cheapo pale (mine came with a cute little shovel too)! I used a few fake sea shells from the craft store to make it look more real and beach like. I also threw in a home made candle my mom made. You can get her candles at http://stores.intuitwebsites.com/PixieDustCandles/StoreFront.bok

To make the filling I layered:
  * vanilla pudding
  *sugar cookie crumbs
  *sliced bananas & strawberries
Obviously the amounts will depend upon how big your pale is.
   *Top it off with sugar cookie crumbs for the sand look!
Feel free to switch up the inside ingredients. You can use whatever pudding you like best. You could also use No bake cheese cake instead of pudding.  Make it your own and get creative, just make sure you top it off with the sugar cookie crumbs for the sand look ; )

Enjoy!

Tuesday, April 5, 2011

How to make a cute magazine page bow


Cheap, easy and your recycling : )   All you need is an old magazine, scissors and either brads, glue or tape.

*Cut your strips. You can cut the strips large or skinny depending on how you want your bow to look. I recommend starting with about a 1 " strip.  You can cut the page vertical (long ways) for a bigger bow.


*Make your loops if your using a brad poke it through the middle if not just glue or tape the strip.
*Continue making the loops and putting them on the brad  or taping/ gluing until you have a nice and full bow. If your using a brad, open the brad and your all done. Nice and easy!

How to make wall art out of recycled materials


These are so simple and fun and the best part is they are mostly made from things that could have ended up in our landfills. I didn't spend much time on mine but you could really make something nice if you have the patience.
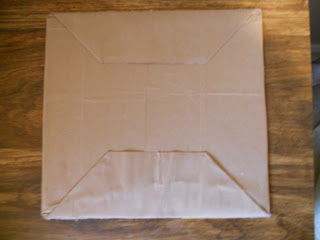
First create a canvas for your art by taking a piece of cardboard. I used the back of an old minute rice box, but you can use whatever you have on hand. Take a paper bag and wrap the card board like you would a gift. should look like this..

Once you have your canvas you can begin decorating. For mine I used some scrap booking paper, a ribbon from a gift basket that was given to me, and a few old greeting cards. 
You could also use old broken jewelery, magazine pages, pictures from old calendars, etc.

To hang the wall art I use two pop can tabs, glued to the back, then I used some ribbon to tie together the pop can tabs and the little stick I got from my yard. Glue the ribbon in place on the stick and your good to go. I have also used ribbon from gift bags for a hanger as opposed to the pop can tabs, and stick.


Sunday, April 3, 2011

Quilling with bark

This is a lot more difficult than quilling with paper. I used some fairly fresh cherry bark. I would imagine that the fresher it is the easier it will be to work with and ply. It works best if you cut the strips thin. Since bark doesn't keep it's shape like paper does I used some clamp clips I had to hold some of the spirals in place for  about 5-10 mins. Here are the results....

This is the clamp I used. It looks huge but it's really just a chip bag clip. : )

I will be using the hearts I made to make  a cute wall decor piece that I will post when finished. 


Paper Quilling

Paper quilling is fun, in-expensive and really easy. I came across it the other day on line and thought I would give it a try using materials I already had around the house. I used card stock, super glue, a pen, toothpick, ruler &  exacto knife. The great thing about paper quilling is that it is very reasonably priced. I found a kit on Amazon.com for under $11.00 http://www.amazon.com/Paper-Quilling-Kit-For-Dummies/dp/B003HHLAPW/ref=sr_1_1?ie=UTF8&qid=1301845816&sr=8-1

I had a lot of fun playing around with this. My creations are sloppy looking because I am a beginner, but I think the biggest reason is the fact that I'm using strips of card stock that I cut my self and I can't cut a straight line to save my life.Although I haven't personally used it yet, I definitely recommend quilling paper and I will post again when I get my hands on some.

 Here are some photos of the things I made.


Pretty Pink Flower


My Love
Summer!


Love


Cute Butterfly

I will be posting some How-to's as soon as I get that quilling paper.